|
|
Account TypesThis Help File Page was issued on 09/30/2017 |


|
|
Account TypesThis Help File Page was issued on 09/30/2017 |
 Scroll to Top of Page
 Print Topic
 Email Feedback
 Show/Hide Expanders
❑Each Subscriber's Alarm System that will be monitored with this Central Station Monitoring module, must be identified as a monitored account within the Central Station Data section on the Edit View's Monitoring tab on the Subscribers Form.
•As part of that process, each monitored Subscriber must be assigned an Account Type - which is a general classification of the type of monitored account this will be.
✓These of monitored account are identified in the Account Type (maintenance) Form where the Types of Subscriber Accounts that each premises represents (e.g., Commercial, Industrial, Residential, UL Burglary, or Institutional) are defined
✓Account Types are primarily used to help Operators within the Central Station Monitoring module to better understand the Alarm Signal being processed.
•You may define as many Account Types as appropriate for your Company's business model.
✓The Account Type classification allows Operators to better understand the type of system to which she/he is currently responding.
✓The Account Type also provides a list sequencing and selection function for the Monitored Accounts List, Active Passive Accounts Report and the Subscriber Information Forms report.
✓The Account Type may be used as a Special Filter option for the Subscriber Listing and in Subscriber Information Forms reports.
•To Access the Account Types Form:
a)From the Backstage Menu System Select Maintenance and Choose the General option, then select the General Maintenance option which displays the secondary Maintenance Menu, or
b)From the Quick Access Menu, Select Maintenance and Choose General Maintenance to display the secondary Maintenance Menu.
✓Once the Maintenance Menu is displayed, Choose the Monitoring sub-menu, then Click on the Account Types option.

Account Types Form
✓This Account Types Form may be Re-sized by Dragging the Top and/or Bottom up or down, and/or the Right side in or out.
•Navigation Menu - The Navigation Menu is located at the top of the Account Types Form.

✓This Navigation Menu provides the normal Record Movement, New, Delete, Save, Refresh, and List options.
•Record Editing View - The details of the currently selected record are displayed below the Navigation Menu at the center (Main Body) of the Account Types Form.

•To define the Account Types which will be used to identify the type of monitored account in the Central Station Data Form.
✓Click the ![]() Icon to start the Account Type entry in the Record Editing section.
Icon to start the Account Type entry in the Record Editing section.
✓Account Code - Enter up to three characters - Capital letters, spaces, numbers and basic punctuation marks are accepted - to identify this Account Type.
✓Description - Enter a brief description of up to 30 characters in length for this Account Type which is a general classification of the type of monitored account it is.
▪The Description may up to 30 characters in length and include upper and/or lower case letters, numbers, spaces and normally used punctuation marks.
✓Type - Using the Drop-Down Selection List provided, Choose whether this Account Type should be classified as either Commercial or Residential for the UL Statistic Report - MEW Factor reporting requirements.
✓Click the ![]() Icon to record this entry.
Icon to record this entry.
✓Repeat this process, as needed, to define each of the general Account Types for which your Company provides services.
![]() List Icon - The Navigation Menu also has a List option which provides a tabular view of these Account Type records.
List Icon - The Navigation Menu also has a List option which provides a tabular view of these Account Type records.

Account Types Form - List View
✓Some columns may contain expanded comments or other information which may make the List View's display somewhat difficult to use.
Ø - Click the Asterisk at the left of the row of Header Names to display a Drop-Down Check List of each column's Headed Name.
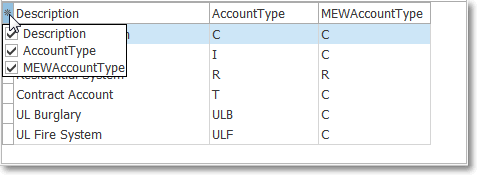
▪Check any Header Name to be included in the List View (by default, All Header Names will be Checked)
▪Remove the Check for any Header Name (see illustration below) that is to be removed from the List View.
✓Click the List Icon to display the associated Grid Data.
✓The columns of Grid Data may be rearranged, filtered, sorted, and exported as a PDF file and/or an Excel formatted file.

✓Find - Enter text to search for a specific record, then Click the Find option.
✓Clear - To remove the text to search for entry, Click the Clear option

Navigation Menu shown with the List Options for Export & Print
✓Click the List Icon again to Close the List View and return to the Record Editing View.
❖See the Grid & Lists - Print Preview - Export Data chapter for complete information on using the List View, including its Export & Print options.