❑Micro Key Solutions™ also supports several Manual Payment Gateway providers.
•There are three simple steps to complete to enable a Manual Payment Gateway provider:
1.Sign up with the (typically) Bank that will provide Gateway services to your Company..
2.Identify the File Format required by that Manual Payment Gateway
3.Update (most have been created already) the Payment Gateway information, as may be required.
➢Important Note: If Tokenization is turned on to protect Credit Card Numbers, you can not and should not use any Manual Payment Gateway (File Based) for Credit Card Processing!
•Access the Payment Gateways Form:
a)From the Backstage Menu System Select Maintenance and Choose General and Click the General Maintenance option which displays the Maintenance Menu, or
b)From the Quick Access Menu, Select Maintenance and Choose General Maintenance to display the Maintenance Menu.
•Once the Maintenance Menu is displayed, Select Receivables and Choose Payment Gateways.

Payment Gateways Form - typical Manual Gateway entry
✓This Payment Gateways Form may be Re-sized by Dragging the Top and/or Bottom up or down, and/or the Right side in or out.
•Navigation Menu - The simplified Navigation Menu is located at the top of the Payment Gateways Form.
✓This Navigation Menu provides the normal Record Movement, plus Add, Delete, Cancel, Save, Refresh, and List options.

•Record Editing View - The details of the currently selected record are displayed below the Navigation Menu at the center (Main Body) of the Payment Gateways Form.
✓Select the desired Payment Gateway record or Press Insert to start a new record.
➢Important Note: Before you create your a Payment Gateway you should check to see if one already exists for that Payment Processor.
If it exists, then all you may need to do is a minimal configuration for the Authentication Information.

Payment Gateways Form - Forte Record Editing View
✓Gateway ID - This record number will be assigned by the system as the record is initially saved.
✓Gateway - Enter the desired internally created description for the Gateway
▪Description of the Manual Payment Processor Account, we recommend adding additional information like the Bank account's last digits to clearly identify where the funds will be deposited when this Gateway is used
✓Payment Processor - Using the Drop-Down Selection List provided, Choose the appropriate Manual Payment Processor.
▪Select one of the Payment Processors for this non-automatic processor when using one that requires a file transfer.
✓Bank Account for Deposit - Using the Drop-Down Selection List provided, Choose the Bank into which the Receipts (Funds) are to be deposited.
✓File Format - File type for uploading payment draft to your Payment Processor portal:
▪This is required for Manual Gateways where a text file must be sent with the payment information to be processed.
▪This field is only for Manual Gateways where a text file must be sent with the payment information to be processed.
▪If an Upload File will be required, use the Drop-Down Selection List provided to Choose the appropriate File type.
▪File formats for the most frequently used Banks and other Manual Gateways are provided in this list
✓Active - Check this box if this Payment Gateway is actively being used (this is the default setting).
▪If Active is checked, the Gateway will be shown in the Automatic Billing and the Auto Draft screens, remove the Active Check mark for all Gateways that you do not use and don’t want to see in the system
➢Note: A Payment Gateway may be set up to be:
i.the Default Payment Processor for Credit Cards transactions, or
ii.the Default Payment Processor for ACH/Check transactions, or
iii.the Default Payment Processor for both Credit Card and ACH/Check transactions, or
iv.Not the Default Payment Processor for any Credit Card or ACH/Check transactions
✓Default Credit Card (Use as default Payment Gateway for credit card transactions):
▪Although it is unlikely, you could Check this box to identify this Manual Payment Gateway as the one that should be used as the default for processing credit card transactions for those Billing Cycles which have a Check mark in the “Use Default Payment Processor” box of the Processor/Bank for Credit Card payments Check box field
▪Only one Payment Gateway can be identified as the Default Credit Card Processor.
✓Default ACH/Check (Use as default Payment Gateway for ACH/Check transactions):
▪Although it is unlikely, you could Check this box to identify this Manual Payment Gateway as the one that should be used as the default for processing ACH/Check transactions for those Billing Cycles which have a Check mark in the “Use the same Credit Card Processor for Bank Account” box of the Processor/Bank for Bank Accts payments field
▪Only one Payment Gateway can be identified as the Default ACH/Check Processor.
✓Generate Receipts (Create receipts on auto draft generation) - Check this box if this Payment Gateway is to generate a Receipt record within MKMS.
▪Manual Payment Gateways - This applies only to Manual Gateways and indicates that Receipt records will be created for all Payment Transactions at the moment that the Payment Process is runs, and the Payment Batch is created,
oIf a Payment Batch file is Generated for a Payment Gateway that is not one of the Automatic Payment Gateways (InnoEPay, Authorize.net, and Forte.net) and
oThe “Generate Receipts” check box for the Payment Gateway record is Checked, then the MKS ePay Service:
i.Closes all Payment Transaction of the Payment Batch and tags them as approved
ii.Creates the Receipts for all Payment Transactions
iii.Allocates the Receipt to the corresponding Invoice
▪Understanding the process for executing the Email Notification of Receipts:
1)When the "email_receipt_notification" option in Company Setting is set to True ('T') and the Payment Gateway is Manual, and the Generate Receipt option on the Payment Gateway Form is NOT Checked - the Receipt Notification Email is only sent when the User reviews the file returned from the Payment Processor (Bank or Credit Card) and then Clicks on the Approve/Receipt button. -
a)Clicking on the Approve/Receipt button in the Payment Batch File's Payment Transaction Detail (Grid), Approves the Payment and generates a Receipt with an Auth. Code as "MKMS" and Response as "Manually approved. Receipt creation only" inserted in the corresponding Receipt Transaction record in the Payment Batch / File Generation Form's Payment Transaction Detail (Grid).
b)Clicking on the Reject/Bounce button - denies the Payment with Response as "Manually Denied" and does NOT generate any Receipt or send any Receipt Notification Email
2)When the "email_receipt_notification" option in Company Setting is set to True ('T') and the Payment Gateway is Manual, and the Generate Receipt option on the Payment Gateway Form IS Checked - When the Post Auto Draft process is run, the Receipt is generated, but the Receipt Notification Email is NOT sent.
➢Note: For Manual Payment Gateways the Due Date is defaulted to the Date when the Post Auto Draft process was run.
✓Use for Tokenization - Do Not Check this box for a Manual Payment Processor who requires a file transfer to process payments.
▪Do NOT Check this option when you manually send a file to your Payment Processor.

▪Warning: Changing this setting will make existing credit card tokens unusable. All stored credit cards will be lost.
oIf Checked, this Payment Gateway will be used for the generation of all Credit Card Tokens,
oThe tokens generated by one Payment Gateway service cannot be used to process payments with a different Gateway, be very careful before changing this setting.
✓Click the ![]() Icon to record the updated Payment Gateway information.
Icon to record the updated Payment Gateway information.
•Authentication Login Code & Password
✓This data is often incorporated in the File sent to the Manual Gateway.
✓Check with your Company's Manual Gateway Provider for those instructions.
✓Almost always, No Login or Password will be required.
•Gateway Configuration Parameters
Key |
Value |
|---|---|
None |
See the manual Payment Processor's instructions for this information. |
✓Manual Payment Gateway parameters
▪Normally none required.
▪However, for the File Format “Standard”, “TD Merchant”, “Merchant Partners”, and “Chase(Secure Batch)”
oA Gateway Configuration Parameter Key of “JulianDate” is added with a Value of "N" (these are used when generating files for these types of File Formats).

✓Click the ![]() Icon to record the updated Payment Gateway information.
Icon to record the updated Payment Gateway information.
![]() List Icon - The Navigation Menu also has a List option which provides a tabular view of these Pay Integrator Gateway records.
List Icon - The Navigation Menu also has a List option which provides a tabular view of these Pay Integrator Gateway records.

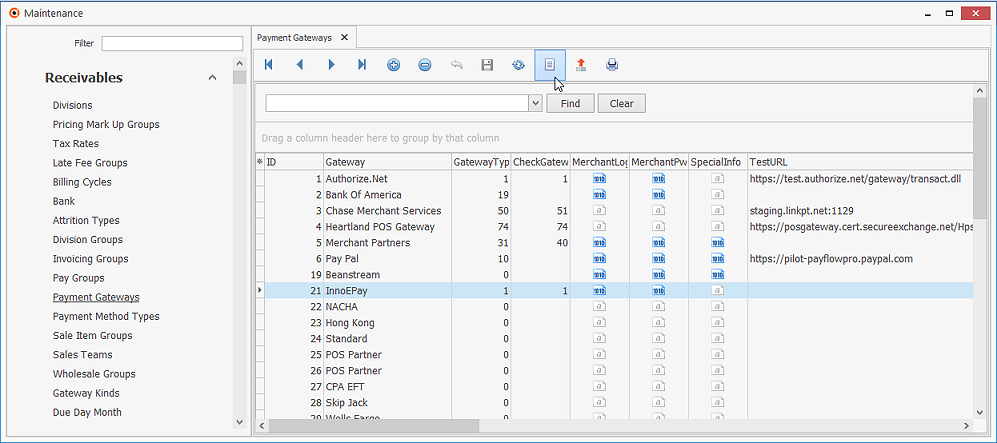
Payment Gateways Form - List View
✓Click the List Icon to display the associated Grid Data.
•Choosing the Columns to be Viewed:
✓Some columns may contain expanded comments or other information which may make the List View's display difficult to use.
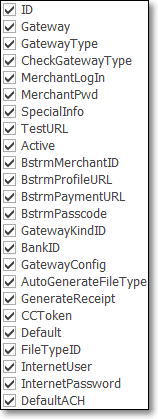
Ø In the List View, you may Click the Asterisk at the left of the row of Header Names to display a Drop-Down Check List of each column's Headed Name.
▪Check any Header Name to be included in the List View (by default, All Header Names will be Checked)
▪Remove the Check for any Header Name (see illustration below) that is to be removed from the List View.

Available Column Names
✓The columns of listed Grid Data may be rearranged, filtered, sorted, and exported as a PDF file and/or an Excel formatted file.

✓Find - Enter text to search for a specific record, then Click the Find option.
✓Clear - To remove the text to search for entry, Click the Clear option
![]()
Navigation Menu shown with the Icons for List, Export and Print
![]() List Icon - Click the List Icon again to Close the List View and return to the Record Editing View.
List Icon - Click the List Icon again to Close the List View and return to the Record Editing View.
![]() Export Icon - Click the Export Icon to create (one of there types of) a spreadsheet compatible file containing the Grid Data as it is currently organized and filtered.
Export Icon - Click the Export Icon to create (one of there types of) a spreadsheet compatible file containing the Grid Data as it is currently organized and filtered.
![]() Print - Click the Print Icon to display the Print Preview Form from which a custom report may be designed and "printed" as an Adobe® PDF File.
Print - Click the Print Icon to display the Print Preview Form from which a custom report may be designed and "printed" as an Adobe® PDF File.
❖See the Grids - Print Preview - Export Data chapter for complete information on using the List View, including its Export & Print options.