❑The Receipts Form has been updated, and the process of Posting Receipts has changed.
•All Receipts must now be classified as either:
a)A Customer Deposit (a payment Amount accepted in advance of an anticipated future - as yet unentered - Sale (recorded in the General Ledger as an Advance Deposit Liability Account
b)An Amount that will be allocated to reduce (or eliminate) the balance due on an existing Invoice
•All Receipts are initially recorded as not deposited
✓Receipts are initially posted to the Undeposited Funds Asset Account in the General Ledger System.
•A Receipt, regardless of whether it is an Advanced Deposit, or will be used to reduce a currently owed Accounts Receivable balance, must be specifically Deposited.
a)A Receipt cannot be Bounced, or Refunded until it has been identified as Deposited.
b)A Receipt cannot be Allocated to an Invoice if it is identified as a Customer Deposit - that designation must be changed (i.e., the Check removed on the Receipts Form) to be able to Allocate it.
c)The new Open Invoices Drop-Down Selection List on the Receipts Form provides a quick and easy will to selectively allocate the current Receipt to one or more Invoices.
•There is a new Deposited Only choice on the Cash Receipts report Options tab.
❑There are now three ways to post Receipts from Subscribers.
1.Open a Subscribers Form.
✓Press F-2 Search on the Navigation section of the Subscribers Form to locate the appropriate Subscriber record,
✓Open the Subscriber Options Menu on the Navigation section of the Subscribers Form, Select the Receivables sub-menu, then Choose the Receipts option.
oThis selection is for posting Receipts one at a time - such as when entering the initial Sale and the associated Receipt from that new Subscriber.
2.Open the Quick Access Menu and Select Maintenance, Choose Receivables sub-menu then Click the Receipt Posting option
3.Click the Post Receipts Icon on the Receivables tab on the MKMS Desktop.
✓These last two selections access the same Receipt Posting Form
✓The Receipt Posting Form is used to post a group of Receipts in the quickest manner possible.
❖Also see the Bank Deposits - Depositing Receipts chapter for information about how these Receipts are to be Deposited.
❑The Receipts option on the Subscribers Form's Subscriber Options Menu is used for posting Receipts one at a time, from a specific Subscriber. To do so:
1.Open the Subscribers Form
2.Press F-2 Search on the Navigation section of the Subscribers Form to locate the appropriate Subscriber record,
3.Open the Subscriber Options Menu on the Navigation section of the Subscribers Form, Select the Receivables sub-menu, then Choose the Receipts option to display the Receipts Form shown below.
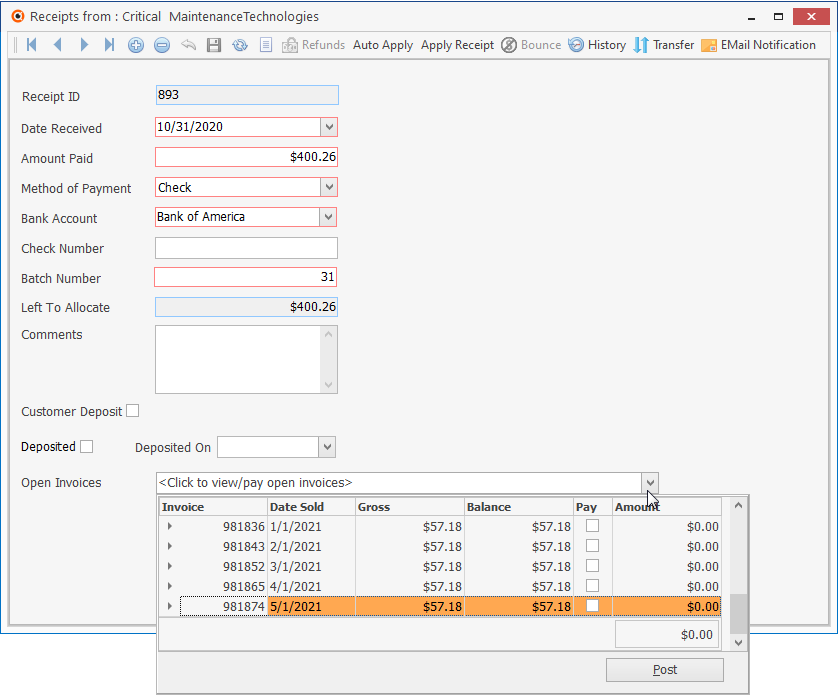
Receipts Form
✓This Receipts Form may be Re-sized by Dragging the Top and/or Bottom up or down, and/or the Right side in or out.
•Navigation Menu - The new Navigation Menu is located at the top of the Receipts Form.
![]()
Receipts Form - Navigation Icons & Actions Icons
✓This Navigation Menu provides the normal Record Movement, Insert, Delete, Cancel, Save, Refresh and List Icons; as well as Add/Edit Refunds, Auto Apply, Apply Receipt, Bounce Receipt, and View History Icons.
•List Data View - A tabular (spreadsheet style) view of the previously entered Receipts is easily accessible.
![]()
✓Click the List Icon to display the associated Grid Data.
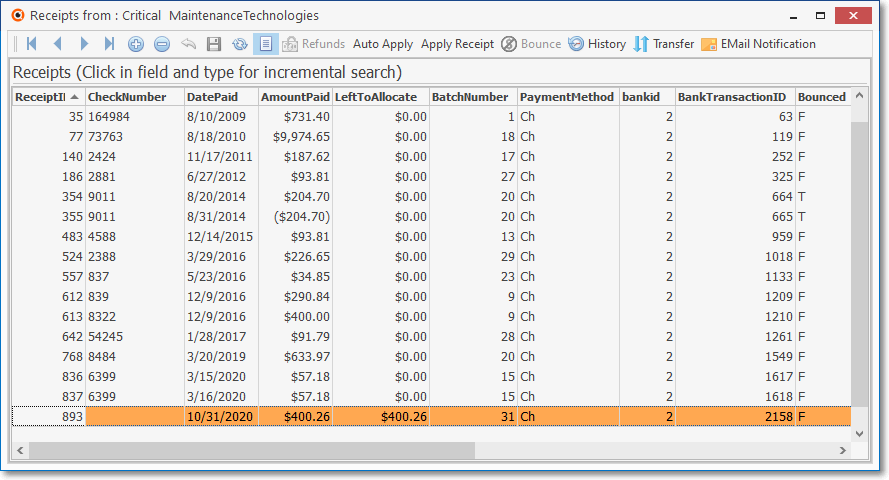
Receipts Form - List View
▪There is a Horizontal and/or Vertical Slide Bar - displayed when needed - located at the bottom and/or side of the Receipts List to allow the User to view all of the data included in all of the columns.
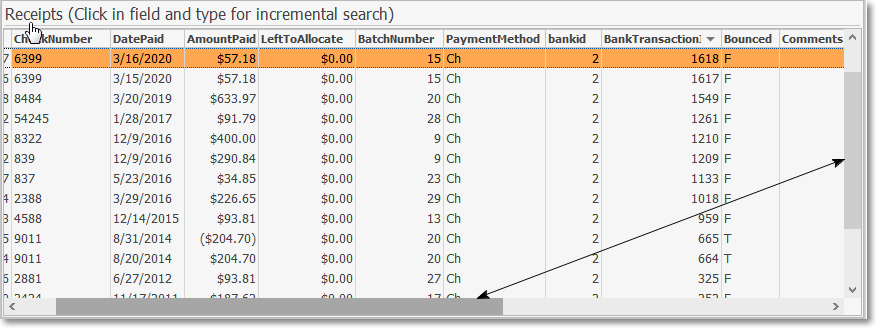
✓The columns of Grid Data may be rearranged, filtered, sorted, and exported as a PDF file and/or an Excel formatted file.

✓Find - Enter text to search for a specific record, then Click the Find option.
✓Clear - To remove the text to search for entry, Click the Clear option
![]()
Navigation Menu shown with the List Option
▪Click the List Icon again to Close the List View and return to the Record Editing View.
❖See the Grids - Print Preview - Export Data chapter for complete information on using the Grid Icon.
❑Record Editing View - The details of the currently selected record are displayed within the Receipts tab below the Navigation Menu at the center (Main Body) of the Receipts Form.
Receipts Form - Record Editing View
•Receipts are initially recorded as an Amount Paid to your Company
a)To reduce the balance owed on a Subscriber's Account to pay off an existing Invoice, or
b)As an Amount to be held in escrow (i.e., as a Customer Deposit).
✓This Receipt entry will document when (the day received and the batch number it was assigned to), how (check, EFT, cash, etc.) it was paid, how much was paid, and where (into which Bank account) it will be deposited.
➢Note: See the "Batch Number Assignment" discussion in the Receipts chapter for more information about Batch Numbering.
✓When this Receipt is recorded, it must be identified as one that will be Allocated to one or more selected Invoice(s), or as a Customer Deposit.
1.If the Receipt is for a Customer Deposit, that box should be Checked before saving the record.
2.If this Receipt is to be Allocated to (1.) specific Invoices, (2.) to the oldest Invoice with an outstanding balance, or (3.) Invoices you specifically choose.
oUse the (1.) Auto Apply, (2.) Apply Receipt, or (3.) Open Invoices option, as appropriate, to designate which Invoice(s) should be Paid with this Receipt.
✓Receipts that have been fully Allocated will show a Left To Allocate balance of $0.00.
✓Receipts that were automatically posted and Allocated using the Auto Draft feature will also have a message identifying that process next to the Date Received field.
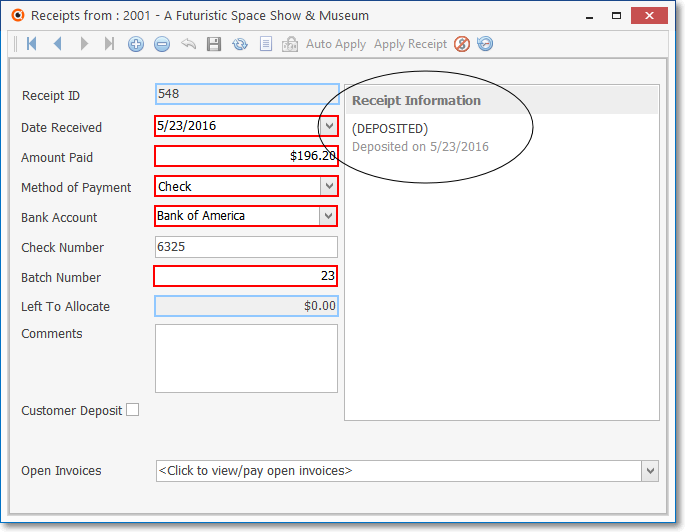
•Once recorded, a Receipt must then be Deposited using the Bank Deposits Form.
Posting Receipts
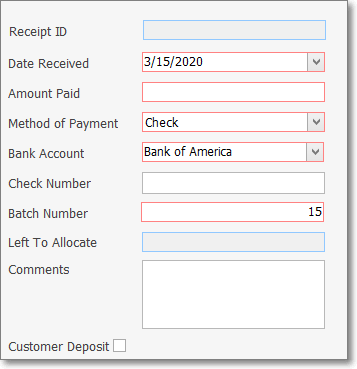
•To record a Receipt:
✓Click the ![]() Icon to start the Receipt entry in the Record Editing View.
Icon to start the Receipt entry in the Record Editing View.
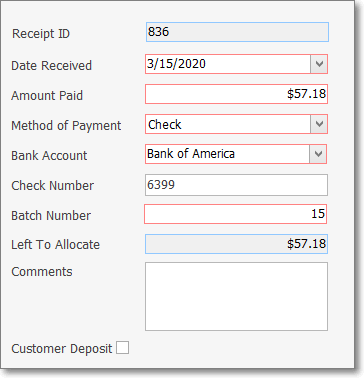
▪Receipt ID - This is a system maintained field which contains the record number of this Receipt, it is assign when the record is initially saved.
▪Date Received - Today is the default Date, but - using the Drop-Down Calendar/Date Entry field - another Date may be Chosen.
▪Amount Paid - Enter the Amount of the Receipt.
oA negative Amount [e.g., -1.00, or (1.00)] is not permitted.
▪Method Of Payment - Check is the default, but - using the Drop-Down Selection List - another Payment Method may be Chosen.
oThe eight Methods of Payment are:
1)American Express - charged to this Credit Card
2)Cash - received an actual Cash payment
3)Check - paid with a Business or Personal Check
4)Discover - charged to this Credit Card
5)Electronic Transfer - received Direct payment from Subscriber's Bank
6)MasterCard - charged to this Credit Card
7)Visa - charged to this Credit Card
8)Other - paid via "In-Kind" or with something else of value to your Company
▪Bank Account - The default Bank Account defined in the Company Options tab of the User Options Form will be inserted.
oIf needed, use the Drop-Down Selection List to Choose a different Bank Account into which these funds are supposed to be deposited (see the Bank Deposits - Depositing Receipts in the Bank for additional information).
oThe same Batch Number (see Batch Number below) should never be assigned - within the same Month - to Receipts that will be deposited into different a Bank!
▪Check Number - Enter the Check's Number, or any other appropriate characters (such as the last 4 digits of a Credit Card, confirmation code) which may include numbers, Upper and lower case letters, basic punctuation, or spaces for identifying this Receipt.
▪Batch Number - Enter the appropriate number which, by default, will be today's date number but may be changed as needed.
➢Note: See the "Batch Number Assignment" discussion in the Receipts chapter for more information about Batch Numbering.
oThe same Batch Number should never be assigned within the same Month to Receipts that will be deposited into different Banks!
oBatch Numbers may be assigned from 1 to 32637 (this limitation is a function of the field type into which you are entering this Batch Number).
a)You may start a new numbering sequence each month (using the current Date's Day number), so the same Batch Number will be used in multiple Months but the date will be different.
b)In some cases, you may use the same Batch Number for more than one day to group certain of these types of payments together.
c)You may use multiple Batch Numbers within the same day to separate Credit Card transactions from Cash Receipts, and to separate those Receipts from EFT funds.
d)You may start from 1 and increment the Batch Number perpetually (if you used 2 batch numbers for two deposits every day, 5 days a week, it would take over 60 years to use all of the numbers).
e)The down side of the second method is that you must keep track of the next number to be used.
f)MKMS automatically records Receipts in an individual Month & Year group to keep them differentiated.
▪Left To Allocate is listed as $0.00 until the transaction is saved.
▪Comments - Enter any appropriate Description or Notation relating to this specific Receipt.
oThis Internal Note (Comment) may be entered or modified "after the fact" (i.e., even later, after the Receipt was initially saved) in this Receipt Form.
▪Customer Deposit - Check this box (before saving the record) when this Receipt is intended to be a Deposit on Account in anticipation of a future Sale (to be Invoiced at a later time), otherwise it is assumes that this Receipt is intended to pay for one or more existing Invoice(s), and so must eventually be Allocated to those Invoice(s).
oWhen a Customer Deposit needs to be converted to a standard Receipt record (assuming that is has already been Deposited in a Bank):
➢Note: Until a Customer Deposit is Deposited in a Bank, it may be re-identified as a regular Receipt by simply removing the Check in the Customer Deposit box.
i.Click the Make Deposit button on the Receipts Form
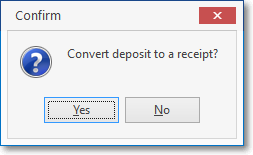
ii.Click Yes to confirm this action.
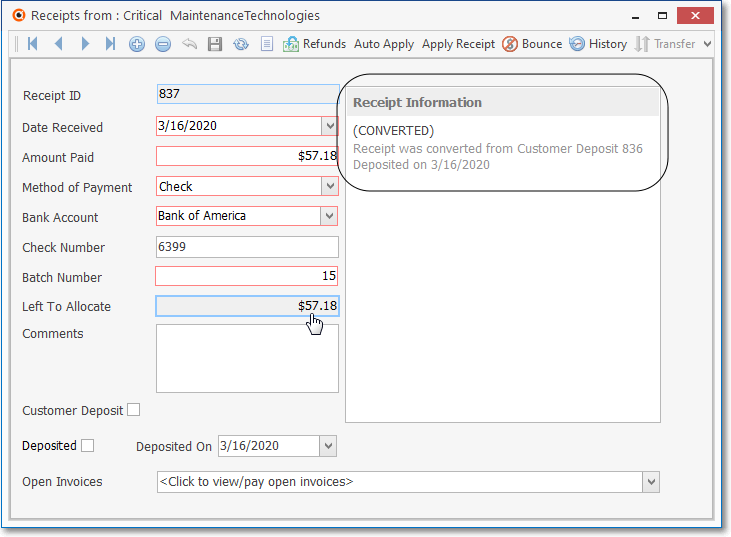
iii.The will be converted from a Customer Deposit to a standard Receipt and a message to that affect is included on the Receipt Form's information panel.
✓Click the ![]() Icon to record this Receipt entry.
Icon to record this Receipt entry.
•Understanding the Left To Allocate field:
✓The Receipt is initially recorded as either:
a)A Deposit on Account if the Customer Deposit box is Checked, or
b)As an Amount Paid toward the Subscriber's existing Accounts Receivable balance, in which case this Receipt may now (or eventually) be Allocated one or more specified Invoice(s) .
✓To Allocate the Receipt (see the Allocate chapter for more information):
a)Use the Open Invoices Drop-Down Selection List, or
b)Use the Auto Apply option, or
c)Use the Apply option.
✓The Left To Allocate Amount is automatically adjusted and updated by the system as all (or portions) of the Receipt are applied to designated Invoice(s)..
Depositing Receipts
❑Using the new Bank Deposits Form
•Open the Bank Deposits Form:
a)From the Backstage Menu System Select File and Choose Receivable and Select the Bank Deposits option, or
b)From the Quick Access Menu, Select File and Choose Receivable and Select the Bank Deposits option
1.Record the Bank Deposit:

Bank Deposits Form
a.Each Receipt item - which has not been identified as Deposited - will be listed on the Bank Deposits Form.
b.Deposit Date - Using the Drop-Down Calendar/Date Entry field provided, Select the Deposit Date on which this Deposit will be (has been) made (Today is the default).
c.Deposit - Click the Deposit Icon.
d.Choose the Receipts that are to be deposited using the dialog that will be displayed:
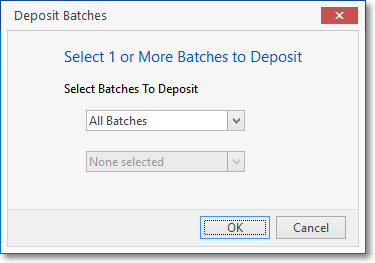
All Batches option
i.All Batches - By default (as shown above), All Batches of Receipts will be identified as Deposited.

Specific Batch option
ii.Specific Batch - Alternatively, using the Drop-Down Selection List provided, you may Check a set of one or more Batch Numbers to be identified as Deposited.
iii.OK - Click the OK button to execute this Bank Deposit.
e.Follow these directions to Print a Cash Receipts Report to list those Receipts that were recorded as deposited:
i.Based on which Receipts were Chosen on the Bank Deposits Form to be deposited, Select one of these reporting Period options:
a)For all the Receipts posted Today, or
b)Receipts posted specifically for the One Batch Number assigned to a set of Receipts, or
c)For any Receipt's Batch Numbers that were posted within a designated Date Range
ii.Check the Deposited Only box
iii.Choose the Bank to which they were deposited
iv.Specify the Payment Type(s) that are to be reported (i.e., American Express®, Cash, Check, Discover®, Electronic Transfer, Mastercard®, Other, Visa®)
v.Print this Cash Receipts Report.
f.Confirm the Total of the selected Receipts identified as Deposited above, and recorded on your Deposit Slip, matches this Cash Receipts Report.
g.Receipts which have been Deposited will show that information in the Receipt Information section of the Receipts Form.
2.Deposit those selected Receipts in the Bank
3.Attach the validated Deposit Slip to the Cash Receipts Report (produced as explained above in steps e., i. - v.).
4.Save these documents, together in one place, until you have Reconciled that Bank Statement.